Q-global is a web-based application for test administration, scoring and reporting. It houses the industry's gold standard in assessment tools and is accessible from any computer connected to the internet. Secure and affordable, Q-global helps you quickly and efficiently organize examinee information , generate scores, and produce accurate, comprehensive reports.
Open a web browser and enter the following URL https://qglobal.pearsonclinical.com
Enter username and password.
Select language type.
Click the Sign In button.
Q-global provides a simple way for a user to recover their own username and/or reset a password.
Recover Username
On the Sign In page, click the Need help signing in? link.
Scroll down to the "Forgot Username?" section of the page.
Enter your email address (use the email address that we have on file for your account).
Click the Send button.
A confirmation message will appear at the top of the page.
An email will be delivered to the requestor with the username(s).
Reset Password
On the Sign In page, click the Need help signing in? link.
In the "Forgot Password?" section of the page, enter your username.
Click the Send button.
A confirmation message will appear at the top of the page.
An email will be delivered to the requestor with instructions on how to reset the password.
Open the "Reset Password" email from Q-global.
Click the link provided in the body of the email.
Enter a new password.
Confirm the new password.
Click the Submit button.
When the system detects multiple failed login attempts, it will temporarily lock out the user for a short period of time. During the lockout period, a timer will display on the screen to indicate how much time remains before the user can attempt to login to the system.
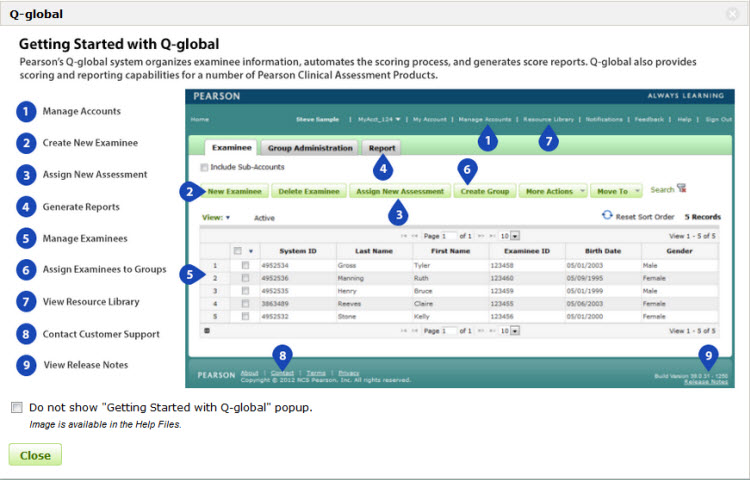
When you log into the system, a pop up image will appear. You have the option of turning this image off (by selecting the check box) or leaving it on and clicking the Close button to close the pop up window. If you turn the pop up image OFF, you will NOT have the ability to turn it back on.
Click the home link from the header navigation menu. Examinee table will display.
Click the New Examinee button above the table.
Enter information for the new examinee.
Click Save.
Click the home link from the header navigation menu. Examinee table will display.
Find the examinee in the table.
Click the check box next to the examinee's name (if you click on the row, the Examinee Details page will display).
Click the Assign New Assessment button above the table. A pop up window will display.
Select the Assessment. The Assessment Details page will display.
Enter information for the assessment.
Click Save.
(from
the Examinee Details page...)
Click the Assign New Assessment button. A pop up window will display.
Select the Assessment. The Assessment Details page will display.
Enter information for the assessment.
Click Save.
Click the home link from the header navigation menu. Examinee table will display.
Find the examinee in the table, click anywhere on the row to select the examinee. Examinee details page will display.
Click the check mark next to the assessment name (if you click on the row, the Assessment Details page will display).
Click the Generate Report button above the table. A drop-down menu of reports will display.
Select the Report. A report configuration window will display.
Select the report options.
Click Generate Report.
Note: Only assessments with a status of "Ready for Reporting" or "Report Generated" are available to generate a report.
From the
Assessment Details page...
Click the Generate Report button.
Select the Report type from the drop-down list.
Select the report options.
Click
Generate Report.
Click Manage Accounts from the header navigation menu.
Select from the account tree hierarchy the account or sub-account to which the user will be added.
Click the Users tab.
Click the New User button.
Complete the Create Account User form.
Click Save.
Select Manage Accounts from the header navigation menu..
Click the New Account button.
Select the Parent Account by clicking on the ellipse (…) to the right of the field. This expands the panel to relate the new account within the account hierarchy.
Fill in all the required fields.
Click Save.
Click Manage Accounts from the header navigation menu.
Select from the account tree hierarchy the account or sub-account to which an activation URL email needs to be resent.
Click the Users tab.
Click on the Last Name of the user.
Click Regenerate Activation URL.
Click My Account from the header navigation menu.
On the My Account page, click the Change Password button.
Complete the old, new and confirm password fields.
Click Submit.
Click Manage Accounts from the header navigation menu.
Select from the account tree hierarchy the account or sub-account to which the inventory will be added.
Click the Inventory tab.
Click Buy Now.
Please note that Q-global is a scoring and reporting system that
uses digital inventory to generate reports. The system
does not allow account owners to purchase inventory within the software
application. The Buy Now,
is a link to the
Pearson Clinical Assessment website which provides information on how inventory
can be purchased by qualified owners.
Click the home link from the header navigation menu.
Click the More Actions button above the examinee table.
Click Import Data. The Manage Imports page is displayed.
Click Import. A dialog box will open with a Browse button.
Click Browse. This will open dialog box. Navigate to the import file location.
Select the file and click the Open button. The Import Examinees dialog box will open again and the path to the file should be visible.
Click the Import File button.
A message box will display confirming import of the data and creation of the Examinee records. Click OK to continue or Cancel to exit the process.
If there are any problems importing the data file a message will display. Click the Show Details button to view the data and a description of each error or warning.
Click the home link from the header navigation menu.
Click More Actions button above the examinee table.
Select Export Data. The Export Data page is displayed.
Select the Report and Assessment (Form) Name for the data to export. Examiner and Administration Date may be entered to narrow the search results.
The result set may be limited further by entering data in the Demographic Criteria section.
Click the Search button. The lower half of the page displays any records that match the selected criteria.
Click the Export button. A prompt will display.
Click Open to view the file using a spreadsheet application. Click Save to save the file to the computer or a network drive..
Click Cancel to exit the process.
Q-global works with a broad range of operating systems. To provide you with the best experience on Q-global, we recommend that your computer meets or exceeds the following minimum system requirements.
| System Requirements |
Description |
| Operating System | Chrome OS Linux Mac OS 10.9 or higher Windows 10 |
| Web Browser | Chrome Edge Firefox Safari 9 or above Recommended web browser settings: * Web browser encryption * Allow cookies to be set for qglobal.pearsonclinical.com * Javascript enabled Pop-Up Blockers Pop-up blockers are intended to block unwanted pop-ups (such as advertising) on websites. Our site recommends that you temporarily disable the pop-up blockers. For specific instructions on how to disable pop-up blockers, please visit your browser's help guide instructions. |
| Internet Connection | Broadband (recommended) |
Copyright © 2018 NCS Pearson, Inc. All rights reserved. Produced in the United States of America.