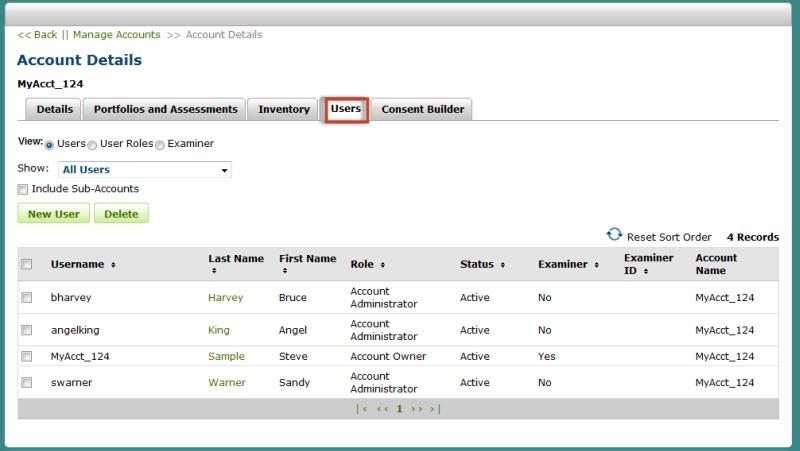
When a new account is created, the person responsible for the account is added to the system as the Account Owner. Additional users can be added to the account by the Account Owner and/or the Account Administrator.
Select Manage Accounts from the header navigation menu.
Select an Account Name from the list. The Account Details page will display.
Click the Users tab. The Users page will display with a table listing all the users for the account (click the check box to include sub-account users).

Click the New User button.
The Create Account User window will open.
Complete all the required fields and any additional information.
Click Save to save the information and close the window.
An activation email will be sent to the new user to complete the process
The new user will then establish a user password and have the ability to log into the system.
Resend Activation Email
You can resend an activation email to a new user who has not registered with Q-global.
Click Manage Account from the header navigation menu.
Click the User tab.
Select the user from the table.
On the user details page, click the Resend Welcome Email button.
A confirmation message will appear at the top of the page indicating that an email was sent to the user.
Once the user has activated the account, this button will no longer appear on the screen.
Click Manage Account from the header navigation menu.
Click the User tab.
Select a user from the list.
On the User Details page, click the This User's Inventory link.
On the user inventory page you can view the user inventory
Click the Modify User Inventory button to manage inventory
You will now be able to allocate and/or de-allocate inventory for this user.
Click the SAVE button to save changes.
A confirmation message will appear at the top of the page.
Navigate to the appropriate account or sub-account page from the Account Hierarchy tree.
Click the Users tab. The Users page will display with a table listing all the users for the account or sub-account.
Click the Examiners radio button.
Click the New Examiner button.
Enter the required fields and any additional information.
Click Save.
Navigate to the appropriate account or sub-account page from the Account Hierarchy tree.
Click the Users tab. The Users page will display with a table listing all the users for the account or sub-account.
Click the Examiners radio button.
Click the check box to select one or more examiners from the list.
Click the Delete command button. A Delete modal window will display.
Click the Yes command button to confirm or click No to cancel. The modal window will close.
The examiner table will refresh and display the current list of examiners.
A confirmation message will appear on the Examiner List screen when the examiner(s) is successfully deleted.
Note: If an examiner is deleted from the
list, the examiner name will no longer appear as an option on the assessment
details
page. However, the examiner name will remain as part of an examinee's
assessment record for any reports generated prior to
the deletion of the examiner from the list.
Navigate to the appropriate account or sub-account page from the Account Hierarchy tree.
Click the Users tab. The Users page will display with a table listing all the users for the account or sub-account.
Click the check box to select one or more users from the list.
Click the Delete command button. A Delete modal window will display.
Click the Yes command button to confirm or click No to cancel. The modal window will close.
The user table will refresh and display the current list of users.
A confirmation message will appear on the page when the delete is complete.
Note: When a user is delete from the account, all the inventory that was allocated to the user, will return to the account so that it may be re-allocated to other users.
Click the Manage Accounts link from the header navigation menu.
Select the appropriate account or sub-account page from the Account Hierarchy tree.
Click the Users tab.
Click the User Roles radio button
Click the Role Name link. The Role Details page will display.
The privileges will display for the user role selected.
Click the Back link to return to the Account Details page.
Click the Manage Accounts link from the header navigation menu.
Select the appropriate account or sub-account page from the Account Hierarchy tree.
Click the Users tab. The Users page will display with a table listing all the users for the account or sub-account.
Click the User Roles radio button
Click the New Role button
Enter a Name for the role.
Select a value from the list "Copy Privileges From Role" and click the Copy button if you want to create a role similar to an existing role. (Optional, see Step 7)
Select the Privileges you would like to assign to this new role. NOTE: If you select the item bolded at the beginning of a section of privileges this is the main function (e.g. Import), checking the main function will cause all of the check boxes under that function will be selected. If you want to create a role with a sub-set of main function privileges, click the check box next to the applicable functions (e.g. Import Examinee Records).
Click Save.