When inventory is purchased, you will need to set up the allocations for the users of your account so they can view digital assets, download manuals or record forms and generate reports.
Managing inventory on Q-global provides you the ability to:
Allocate inventory to users of your account
De-allocate inventory from users of your account
View sum totals of consumed reports (usage inventory model only)
There are three (3) types of inventory methods supported on Q-global:
Digital
Asset Inventory
Manage your inventory of products such as digital stimulus books,
manuals and record forms.
Subscriptions
Inventory
Manage your inventory of reports that are consumed on a subscription
basis.
Usages Inventory
Manage your inventory of reports that are consumed on a per use
basis.
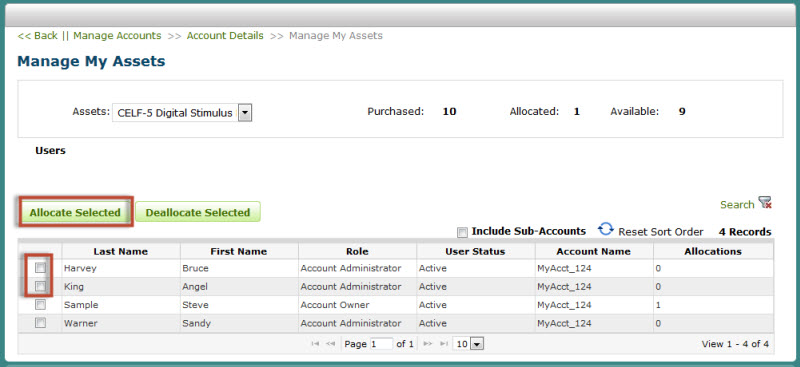
Select a user(s) from the User table (click anywhere on the row and the checkbox will be selected). You can select more than one user at a time.
Click the Allocate Selected command button.
The table will refresh and the allocations will be assigned to the users (the allocation value will be set to (1) one).
The steps for de-allocating an asset from a user(s) are very similar to allocating an asset. When a digital asset is de-allocated from a user, the asset is returned to the account inventory and may be allocated to another user in the account.
Select a user(s) from the User table.
Click the Deallocate Selected command button.
The table will refresh and the allocation will be removed from the user (the allocation value will be set to (0) zero).
Note: If the user is logged into the system when the digital asset is de-allocated, the user will have access to the asset until they log off. When the user logs back in, the digital asset will no longer be available.
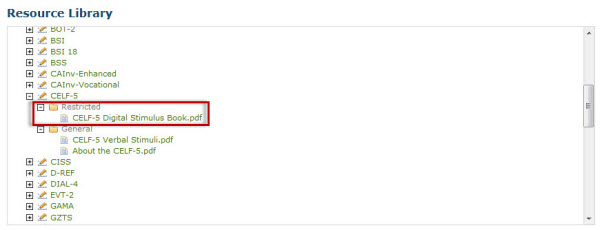
When a digital asset is allocated to a user, the asset will appear in the user’s Resource Library in a newly created Restricted folder.
Click the Resource Library link from the header navigation menu.
Scroll through the list of resources to locate the product.
Click the (+) to expand the view. You should now see the newly created Restricted folder.
Click the (+) to expand the view of the Restricted folder. The digital asset should appear in the list.
Click the link to open the asset.
Digital assets that are purchased (located in the Restricted folder) are available for online viewing only. These assets cannot be downloaded, copied or printed.
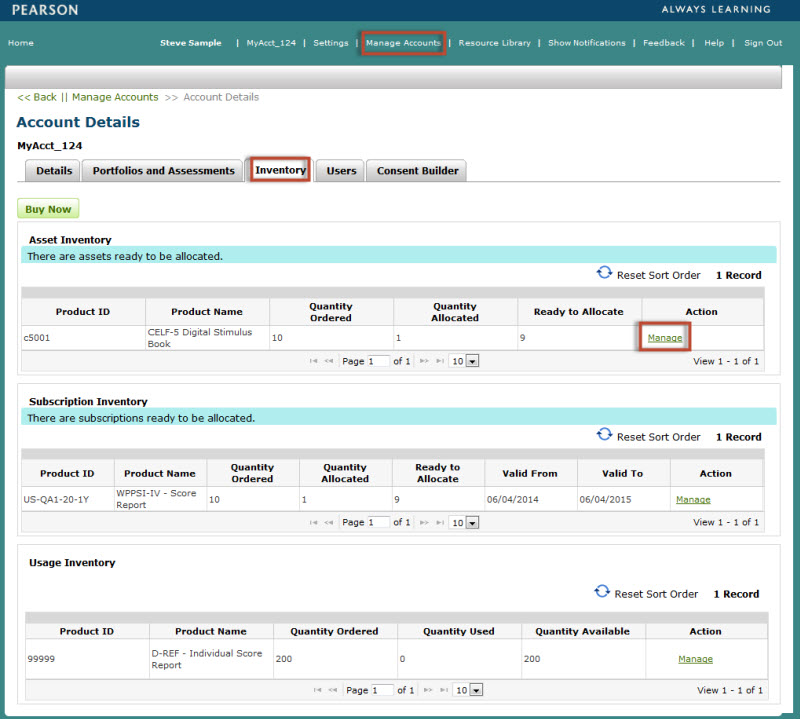
Click the Manage Accounts link from the header navigation menu.
Click on the Account Name to view account information.
On the Account Details page, click the Inventory tab.
Scroll down to the Subscription Inventory table.
Locate the Product Name in the table.
Click the Manage link from the Action column.
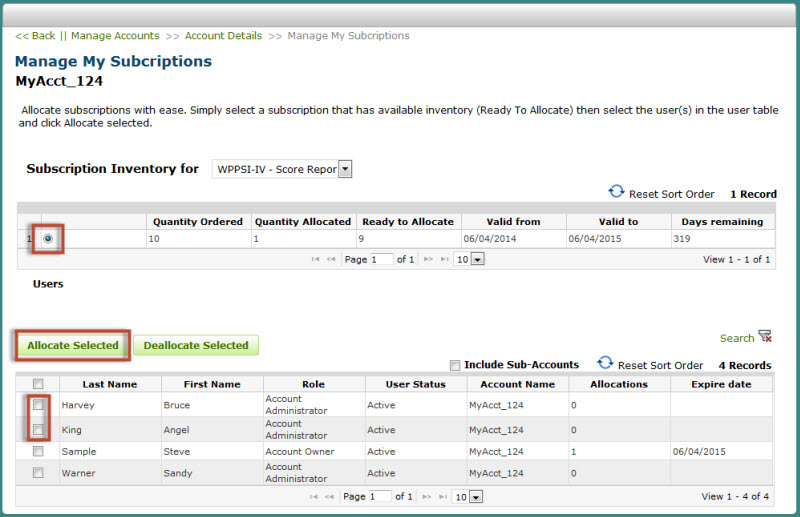
Allocating a subscription to a user is a two step process:
Step 1: Select an available subscription.
The first table on the Manage My Subscriptions page will provide information for all subscriptions purchased for this product. Subscription start dates are set by the account owner or account administrator. Each time a subscription inventory is purchased for a single product, a new line entry is added to the table.
Step 2: Allocate the subscription to a user.
Once you have selected an available subscription from the first table, you can then assign that subscription to a user. A user can only be assigned one subscription.
Select a user(s) from the User table (click anywhere on the row and the checkbox will be selected). You can select more than one user at a time to allocate multiple (bulk) subscriptions.
Click on the Allocate Selected command button.
If this is the first time setting up the subscription, you will need to provide a start date.
The table will refresh and the allocations
will be assigned to the users (the allocation value will be set
to (1) one) and the expiration date will display.
The steps for de-allocating a subscription from a user(s) are very similar to allocating a subscription. When a subscription is de-allocated from a user, the subscription is returned to the account inventory and may be allocated to another user on the account (if the subscription period has not expired).
Select a user(s) from the User table.
Click the Deallocate Selected command button.
The table will refresh and the allocation will be removed from the user (the allocation value will be set to (0) zero).
When a user is allocated a subscription, the user can generate an unlimited number of reports for that product as long as the subscription period has not expired. The user will be able to view the status of the subscription in the Report Configuration window.
• A subscription value of Yes will allow a report to be generated.
• A subscription value of No will not allow a report to be generated.
Most assessment products on Q-global offer the Usage based pricing model to generate reports. When a report is generated for an examinee (e.g. Score or Profile), the account inventory will decrement by one usage. Some products allow for generating complimentary progress and/or group reports.
By default, all sub-accounts and users share inventory. All active users on the account will have the ability to generate reports and consume usages. If you need to control report consumption across the account, you now have the ability to do so. The account owner and/or administrator have the ability to monitor and manage each product (report) usage.
The following section will step you through that process.
Click the Manage Accounts link from the header navigation menu.
Click on the Account Name to view account information.
On the Account Details page, click the Inventory tab.
Scroll down to the Usage Inventory table.
Locate the Product Name in the table.
Click the Manage link from the Action column.
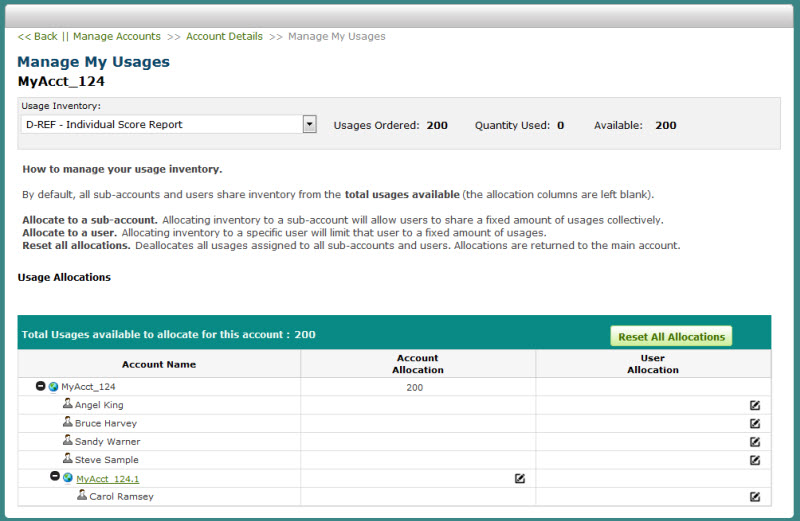
The Usage Allocations table provides the ability to allocate, de-allocate and reset usages for your account. By default, all sub-accounts and users share inventory from the total usages available. When the usages are shared (by default) the information in the table appears to be blank, indicating that everyone shares usages at all times.
Account
hierarchy tree
Click on the (+) or the account name will expand the tree to display all
users and sub-accounts. Click on the (-) or the account name will
collapse the tree and hide the user(s) and sub-account(s).
Total usages available to allocate for this account
The quantity that is displayed is the total number of usages that are available to allocate to sub-accounts and/or users. As usages are allocated and de-allocated, the total number will adjust accordingly.
Account Allocation
Click on the edit icon to allocate or de-allocate usages for a specific sub-account. When clicked, the field will open to allow data entry. Enter a value and click the check mark icon (or simply click the ENTER button to submit the change. The table will refresh with the new value. If the total usages are removed from the sub-account, the total usages available (for the parent account) will increase and the sub-account will be able to share usages from the parent account.
User Allocation
Same functionality as account allocations, but at the user level.
Reset All Allocations
This command button allows you to reset all previously assigned allocations for all sub-accounts and users. All usages will be rolled up to the parent account (displayed as the first row of this table).