Managing Examinees
View an Examinee Detail Record
Click Home to return to the main menu
(this is also the Examinee List page) or click the Examinee tab.
Search the
examinee table for the examinee.
Click any
field on the row to open the examinee record to view the details.
Editing an Examinee Record
Select the
examinee by clicking any field to open the examinee record.
Click the
Edit button.
Complete
the updates to the examinee record.
Click Save.
Deleting an Examinee Record
- Select
the examinee by clicking the check box next to the examinee name.
- Click
the Delete Examinee
button. A dialog window will open.
- Click
the Yes to confirm
the delete. Click No
to cancel.
Archiving (inactivating) an Examinee Record
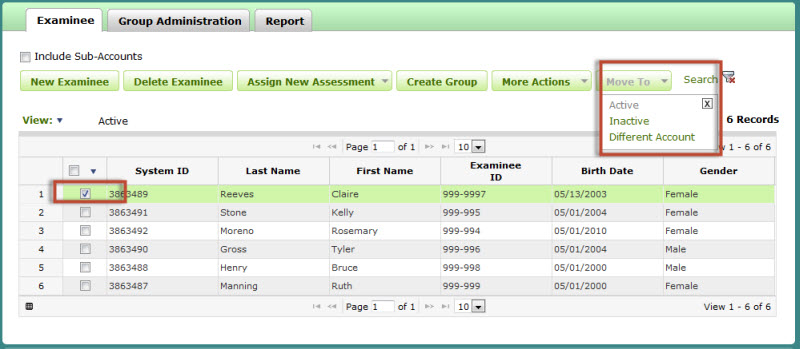
- Select
the examinee by clicking the check box next to the examinee name.
- Click
the MOVE TO command button.
- Select
Inactive (to archive the record).
Note: To activate a record that
has been inactivated, simply follow the same steps and select "active".
Add a New Examinee
See how to add a New
Examinee.
Merge Examinee Records
- From
the examinee table, locate the first examinee record and click the
check box next to the name.
- Locate
the second examinee record and click the check box next to that name.
- Click
the More Actions
button and select Merge Records.
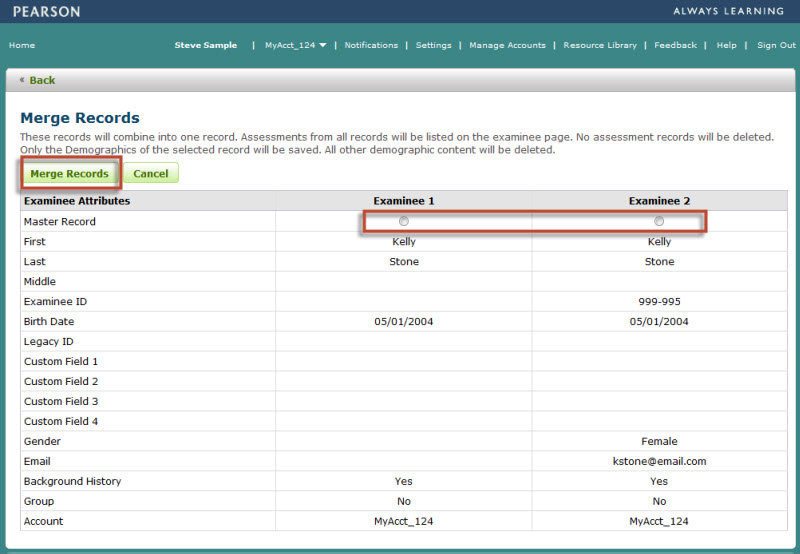
- The
Merge Records
page will display.
- Review
the demographic information on the page and select one
record (select the record with the more correct information). This
record can be edited at anytime.
Note: The examinee record not selected
will be deleted. All assessments associated with that record
will be merged
to the new record.
- Click
the Merge Records button.
- The
Examinee Details page will display with the merged assessment information.

Move an Examinee to Another Account.
Search
the examinee table for the examinee.
Select
the examinee by clicking the check box next to the examinee name.
Click
the Move To button, then select Different Account from the drop down menu.
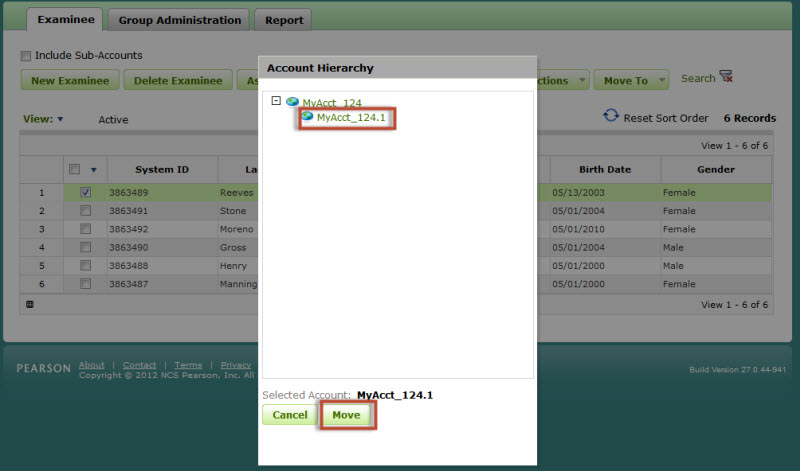
Select
the account or sub-account.
Click
the Move button.


Other Actions
Assigning
an assessment to an examinee
Creating
a group of examinees
Manage
examinee imports
Import
assessment records
Import
user-defined comparison groups
Export
assessment records
Comparison
group generator
Additional Information
- If you
delete an Examinee record all assessments associated with the Examinee
will be deleted as well.
- When
editing the Examinee record the same validations are performed as
when you create a new Examinee record.
- If you
update the examinee's birth date and there are assessments associated
with the examinee, it could impact the form selected or the derived
scores.
- If
you modify the data entered on the record and click the Save button any data carried
on to the Assessment record will be updated.
- You
do not need to have report usages to assign a particular assessment
to an examinee or group of examinees.
- When
you open an Examinee record that has just been created, and click
the Assessments tab, the message "No assessments were found."
will be displayed.
- Although
a field may not be required to save an Examinee record, it may be
required to score and/or generate a report. Some assessments may require
demographic fields that are listed as optional in this page. Consult
your assessment scorability rules to determine if any of the optional
fields on this page may be mandatory for your assessments.
- Your
ability to view or edit information in the platform is based on the
role and privileges assigned to your user account.
- Custom
fields can be set a each Account level. If you have a Main account
and two sub-accounts, the system can have different field labels and
the fields hold different information.


